Quick answer: How to Make Your First Beat in 30 Minutes
The goal is not perfection. The goal is to cross the thresho
undefined undefined undefined.
Quick Answer
You are going to make a real beat in 30 minutes from scratch. No prior experience. No music theory knowledge. No expensive gear. Just a computer, a DAW (all of them have free trials), and this guide. By the end of this page you will have exported your first track and joined the ranks of people who actually make music instead of just talking about it.
The goal is not perfection. The goal is to cross the threshold from “I want to make beats” to “I made a beat.” That line is the hardest part psychologically. Once you have one finished project under your belt, the second one is easier, the third one faster, and within a few months you will look back at your first beat and cringe — then keep making more anyway.
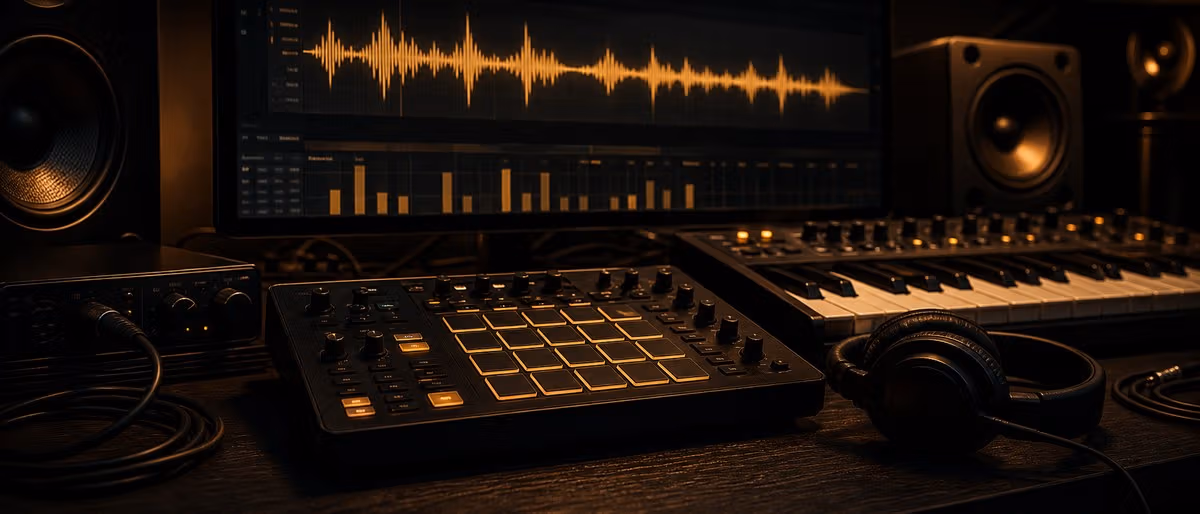
What You Need Before You Start
| Item | What to Get / Notes |
|---|---|
| DAW | Any of these: FL Studio (free trial, never expires), Ableton Live (90-day trial), Logic Pro ($199, Mac only), Reaper ($60), GarageBand (free, Mac/iOS). Download one and install it before you begin. |
| Headphones or Monitors | Any closed-back headphones work for now. Sony MDR-7506, Audio-Technica ATH-M50x, Beyerdynamic DT 770 Pro — these are industry standards under $200. Do not use airpod-style earbuds on a hard desk — they do not give you an accurate picture of the low end. |
| A Computer | Modern laptop or desktop, 8GB RAM minimum. 16GB is better if you plan to run many virtual instruments. All DAWs run on Windows and Mac. Linux users: Reaper is your best bet. |
| Time | 30 uninterrupted minutes. Put your phone on silent. Close your email. This is a sprint, not a marathon. |
That is it. You do not need a MIDI keyboard (you can click notes in), a sound card (your computers built-in audio will work fine for now), or any samples yet. Your DAW comes with everything you need to make your first beat.
Mental Preparation: Your First Beat Will Not Be Good — and That Is the Point
Stop waiting until you are ready. You will never feel ready. Nobody does. Your first beat will sound like a first beat because it is one. It will have clunky transitions, sounds that do not quite fit together, and probably a drum pattern that overcomplicates everything. That is not a bug. That is the process.
The only thing separating you from making music right now is a download and 30 minutes. Not talent — talent is built through doing. Not skill — skill is acquired through repetition. The only prerequisite for making your first beat is starting.
Think of this 30-minute session as a scientific experiment. You are not making art yet. You are gathering data. What does a kick drum on every beat sound like? What happens when you add a hi-hat? How does it feel when something finally clicks and sounds right? That data will compound faster than you expect.
Step 1: Set Up Your Project (2 Minutes)
- Open your DAW and create a new blank project.
In FL Studio, click the little + icon or go to File → New. In Ableton Live, go to File → New Live Set. In Logic Pro, press Cmd + N. In Reaper, it is File → New Project. The exact shortcut does not matter — every DAW has a prominent New Project button on its start screen. - Set your BPM.
Look for the BPM/tempo field — it is usually at the top of the screen, always visible. Type in a number. Here is a cheat sheet:Genre / VibeBPM RangeRecommended StartTrap / Hip-Hop140–160140 or 150Boom Bap / Old School Hip-Hop85–9590House / Techno120–128124 or 128EDM / Future Bass140–175150Lo-Fi / Chill70–9080Pick whatever number sounds exciting to you. There is no wrong choice for this exercise. Type it in and lea... - Check your time signature.
It should say 4/4 — this is the default in every DAW and it is almost certainly already correct. Leave it alone. 4/4 is the heartbeat of most modern music. Changing it before you understand why you would want to is a distraction. - Create a new track.
In FL Studio, right-click in the Channel Rack and add a New instrument. In Ableton, double-click in the Session View area to create a MIDI clip, or add an Audio track from the track creation menu. In Logic, go to Track → New Track or press Cmd + Option + N. In Reaper, right-click in the track area and select Insert New Track. Do not overthink what type of track — just create one and name it “Drums.” You will...
By the end of Step 1 you have an open project with a tempo and one empty track. That is all you need to proceed. Two minutes, done.
Step 2: Find or Make Your Drum Pattern (8 Minutes)
Drums are the backbone of any beat. Every beat you have ever bobbed your head to has a kick on specific beats and a snare on others. We are going to build the most common pattern in modern music — one that works for hip-hop, trap, EDM, pop, and most other genres without modification.
The visual layout of a drum grid
Before you program anything, understand what you are looking at. In every DAW, drums are displayed on a grid. Each column is one beat. Four columns make one bar (or measure). The grid is divided both horizontally (by time — beats 1, 2, 3, 4) and vertically (by drum sound — kick, snare, hi-hat, clap, etc.).
In FL Studio, this is called the Channel Rack. In Ableton Live, it is the Drum Rack or the Clip View on a MIDI track. In Logic Pro, it is the Drum Machine Designer or the Piano Roll on a MIDI region. In Reaper, it is the MIDI editor. The names differ; the concept is identical everywhere.
Program the kick drum on every beat
Click on the kick row at beats 1, 2, 3, and 4. In FL Studio’s Channel Rack, that means clicking the cell at the intersection of the kick channel and each of the four beat positions. In Ableton’s Drum Rack, click the four pads corresponding to the kick sound. In Logic’s Drum Machine Designer, click the four cells in the kick lane. In Reaper’s MIDI editor, draw four quarter-note notes on the kick row.
This is your heartbeat. Kick on 1, kick on 2, kick on 3, kick on 4. Steady, predictable, driving. It sounds almost boring on its own — that is fine. The kick needs the other elements to come alive.
Add the snare or clap on beats 2 and 4
Now add a snare or clap on beats 2 and 4. This is arguably the most important rhythmic choice in all of popular music. Beats 2 and 4 are called the backbeat — they are where your body naturally wants to move. Go ahead and try it: pat your knees or tap your foot. You almost certainly naturally fall into a kick-snare-kick-snare pattern.
In your DAW, find the snare or clap sound, then click on the grid at positions 2 and 4 on the snare row. You now have the foundation of virtually every pop, hip-hop, rock, and EDM song ever made.
Add hi-hats
Hi-hats are the rhythmic glue that holds a beat together. They come in two main types: closed (short, crisp, like a tick) and open (longer, like a shimmer). For your first pattern, follow this formula:
Closed hi-hat on every 8th note — meaning two clicks per beat, filling in the spaces between your kicks and snares. This is called 8th-note hi-hats. Open hi-hat on the off-beats — specifically on the “&” of beat 2 and the “&” of beat 4. These are the upstrokes between the snare hits. Open hi-hats add groove and make the beat feel less mechanical.
Most DAWs come with a preset hi-hat pattern that follows exactly this structure. If your DAW has a preset drum pattern browser (FL Studio’s Browser has preset loops, Ableton has drum racks with patterns built in, Logic has pre-made kits in Drum Machine Designer), find one and drag it in. Using a preset is not cheating — it is how professionals start almost every session.
Quantize to grid
Select all your drum hits and press Quantize (the keyboard shortcut varies by DAW — in FL Studio it is Ctrl + Q, in Ableton it is Cmd + 1 for 1/16 note quantize). Quantize snaps your notes to the nearest grid position, correcting any timing imprecision. For this exercise, quantize everything. You can experiment with humanization and groove later — for now, clean and precise is fine.
Your drum pattern now has: kick on 1-2-3-4, snare/clap on 2 and 4, closed hi-hat on every 8th note, open hi-hat on off-beats. This is a complete, functional drum pattern. Loop it and listen. It already sounds like a beat.
Step 3: Add a Melody or Chord Progression (8 Minutes)
This is where your beat develops a personality. The drums provide the skeleton; the melody provides the mood. You have two legitimate paths here, and both are used by professional producers every day.
Option A: Play a chord with a preset synth
Every DAW ships with at least a handful of built-in synthesizers — software instruments that generate sound. FL Studio has 3xOsc, Sytrus, and Harmless. Ableton has Simpler, Operator, and a suite of other instruments. Logic has Alchemy, one of the most powerful software synthesizers in existence, bundled free. Reaper has a few JS synthesizers built in.
Find a preset synth, load it, and browse its presets. Look for categories like Pad, Keys, Chord, Bells, or Strings. Pick something that sounds pleasing to you — there is no wrong choice. Play a simple chord across your keyboard or click it in using the piano roll.
A chord is just multiple notes played simultaneously. The most foundational chord structure is the triad: root note + third + fifth. For example, if your root is C, the triad would be C (root) + E (third) + G (fifth). That is a C major chord — bright, happy, stable.
Option B: Find a chord loop or sample
The fastest path from idea to beat is finding a ready-made chord loop in your DAW’s browser and dragging it onto a track. Every major DAW ships with thousands of loops and samples. In FL Studio, press F8 to open the Browser. In Ableton, the browser is on the right side of the screen by default. In Logic, the Media Browser contains loops. In Reaper, the Media explorer (Alt + E) has samples.
Search for “chord loop” or “pad loop” or “ambient loop” — something simple and atmospheric that gives your beat a harmonic foundation. Drag it onto your melody track, extend it to cover 8 bars, and loop it.
Decide: Minor or Major?
Music theory simplifies this decision drastically: minor chords sound sad, dark, introspective. Major chords sound bright, happy, triumphant. Trap and drill music almost universally uses minor keys. Pop and mainstream hip-hop frequently uses major keys. EDM flips between builds in minor and releases in major.
Pick one mood. Play a chord progression that stays in that mood. The simplest progression for a beginner is just one chord repeated for 4 bars, extended to 8. One chord, looped, with your drums underneath, is a complete beat foundation. You can complicate it later — for now, keep it dead simple.
Make it 8 bars long
Once you have your chord or loop, extend it to 8 bars. In most DAWs, you can simply copy and paste the 4-bar phrase to fill out 8 bars. Your melody should now loop seamlessly with your drums. Press play and listen to the whole thing from bar 1 to bar 8.
At this point, you have drums + a melodic element. It already sounds like a song fragment. The beat is starting to exist.
Step 4: Add a Bass Line (5 Minutes)
The bass is what transforms a beat from sounding thin and amateur to sounding full and professional. It occupies the low-frequency range that your ears feel as much as hear — the physical thump and weight of the music. Without a bass line, your beat will sound hollow, no matter how good your drums and melody are.
Load a bass preset or use a sine wave
Every DAW has a sine wave oscillator built in. A sine wave is the purest, simplest sound — one frequency, no harmonics, exactly what a bass needs. In FL Studio, load 3xOsc and set it to Sine wave. In Ableton, load Operator and set Oscillator 1 to Sine. In Logic, load the ES2 synthesizer or any bass preset. In Reaper, use the JS Sine Oscillator in the JS synth menu.
If your DAW has a bass preset, use it. Find something labeled Sub Bass, 808 Bass, or simply Bass. The difference between a sine wave bass and a shaped bass like an 808 is mostly tonal color — both serve the same structural function.
Match the root note of your chords
Your bass should play the root note of your chord progression. If your chord is C major (C-E-G), your bass plays C. If your chord is A minor (A-C-E), your bass plays A. The bass follows the harmony, grounding each chord with the note that defines it.
In the piano roll or MIDI editor, click in a bass note at the root on each beat. Start with one note per bar — just the root, sustained for the full bar. Listen. Does it sound right? If your chord is C major and your bass is playing C, it will. The physics of harmony make this work automatically.
The kick-bass relationship
Here is an advanced trick that separates beginner beats from professional ones: sidechain the bass to the kick. This means the bass volume dips slightly every time the kick hits, creating a pumping effect that makes both the kick and bass hit harder. In FL Studio, load the Fruity Limiter on the bass track and use the sidechain input from the kick. In Ableton, use the Compressor effect with the kick as the sidechain source. In Logic, use the Enveloper or a compressor with sidechain. In Reaper, use ReaComp as a sidechain compressor.
If this sounds too complicated for now, skip it. A simple bass line on the root notes will still sound good. The sidechain is polish, not foundation.
Your beat now has four elements: kick, snare/hi-hat, melody/chords, bass. This is a complete beat by any definition. Loop it and listen. It should feel like music now — not a sketch, not a demo, but a beat.
Step 5: Arrange Your Beat (5 Minutes)
Arrangement is how you turn an 8-bar loop into a song. Most beginner producers loop the same 4 or 8 bars for the entire track and call it done. That works for a loop-based genre like lo-fi or ambient, but for hip-hop, trap, pop, and EDM, you need at least a basic arrangement structure.
The simplest arrangement that works
Copy your 8-bar loop. Paste it. You now have 16 bars. For a basic verse, that is enough. For a basic song structure, here is the minimum viable arrangement:
| Section | Bars | What to Do |
|---|---|---|
| Intro | 4 bars | Start with just the drums. No melody, no bass. This creates contrast when the full beat kicks in. Or start with a filtered version of your melody coming in gradually. |
| Verse | 8 bars | Full beat: drums + melody + bass. This is where your listener gets familiar with the core sound. |
| Hook / Drop | 8 bars | The same 8-bar loop but change one element to create contrast. Common approaches: add an extra layer (a second synth, a vocal chop, a riser), increase the hi-hat intensity, or bring in a new melody line on top. |
| Outro | 4 bars | Same as the intro — strip back to just drums, or fade out the full beat over 4 bars. A fade-out is the universal sign that a song is ending. |
The copy-paste arrangement method
Your DAW’s arrangement view (called the Playlist in FL Studio, the Arrangement View in Ableton, the Tracks area in Logic, and the Arrange view in Reaper) is where you place your loops and clips along a timeline.
Think of it like a long strip divided into sections. Drag your 8-bar drum pattern to bars 1–8 and label it “Intro.” Drag the full 8-bar beat (drums + melody + bass) to bars 9–16 and label it “Verse.” Drag it again to bars 17–24 with one modification (extra element, different pattern, or intensity change) and label it “Hook.” Drag the drums-only or faded version to bars 25–28 for the outro.
You now have a 28-bar song. Press play from the top and listen all the way through. Does it feel like a complete piece of music? Does it have a beginning, a middle that holds your attention, and an end? If yes — congratulations. You have arranged your first beat.
Do not overthink this step
Most first-time arrangements are too complicated because beginners feel pressure to add more things. Resist this. The best arrangement is usually the simplest one that serves the music. Your goal for this exercise is not a Grammy-nominated track — it is a finished beat that has a clear structure. You can add, subtract, and rearrange to your heart’s content in future sessions. For now, just get from bar 1 to bar 28 with a clear sense of progression.
Step 6: Export Your First Beat (2 Minutes)
This is the most important step in this guide — and the one most beginners skip. They make a beat, arrange it, listen to it, feel good about it, and then close the DAW without exporting. Three weeks later they cannot find the file and the beat is gone forever. Do not let that be you.
Bounce to WAV or MP3
In FL Studio, go to File → Export and choose WAV or MP3. The keyboard shortcut is Ctrl + Shift + R (Windows) or Cmd + Shift + R (Mac). In Ableton Live, go to File → Export Audio/Video or press Cmd + Shift + E. In Logic Pro, go to File → Bounce → By Track or Cmd + Option + E. In Reaper, go to File → Render or press Ctrl + Alt + R.
Choose WAV format at 44.1kHz / 16-bit — this is the standard for uncompressed audio that preserves quality. MP3 at 320kbps is fine for sharing online. Do not export at a lower sample rate than your project’s rate or you will get pitch and timing artifacts.
Name it and save it
Use a naming convention. Something like “First Beat 2026-03-29” or “My First Beat [Sketch 01]”. Include the date. Dates are free metadata that help you track your progress months and years later when you look back at your early work. Create a dedicated folder on your computer called “My Beats” or “First Beats” and put everything in there.
Share it somewhere
Do not keep your first beat locked on your hard drive. Share it. Post it in a Discord server. Send it to a friend. Upload it to a private SoundCloud link. The act of sharing is a psychological milestone — it commits you to having made something real. And the feedback you get, even if it is just “hey that is cool” from a friend, is fuel for the next session.
You have now done what millions of people say they want to do and never actually do: you opened a DAW, you made something, and you finished it. That is the entire game. The skills will come. The sounds will improve. The arrangements will get more sophisticated. But only if you finish things. This beat is your first finish. There will be many more.
Common Beginner Mistakes — and How to Avoid Them
Making your first beat is an achievement. Making the next 10 is where most people stop. Here are the pitfalls that derail beginners from becoming consistent producers, and how to avoid them.
Spending hours perfecting one sound without finishing
The trap: you spend 45 minutes scrolling through kick drum samples trying to find the “perfect” one. You never get to the melody, the arrangement, or the export. This is called analysis paralysis — the illusion that more preparation leads to better results. It does not. In music production, a finished mediocre beat is worth more than an unfinished perfect one. Make the beat. Export it. Move on.
Using too many sounds at once
Beginners frequently load 15, 20, or 30 sounds into a project and wonder why it sounds muddy and unfocused. The professional instinct is the opposite: fewer sounds, each doing more work. A great kick, a solid snare, crisp hi-hats, one good melody, one bass line — that is five elements. Five elements arranged well beat twenty elements arranged poorly every time.
Neglecting volume balance
Every sound in your mix needs to sit at the right loudness relative to every other sound. A common beginner mistake is having the kick too quiet (and then boosting it until it clips), or having the hi-hats too loud (because crisp high frequencies are exciting), or letting the bass overpower everything (because low-end feels powerful). Use your DAW’s channel faders to set rough levels: kick and bass at unity (0dB), snare slightly below, hi-hats slightly below snare, melody at a level where it sits on top without overwhelming the drums. This is mixing. You will get better at it with every beat you finish.
Skipping the export step
It cannot be said enough: finish and export your beats. Every session should end with an exported audio file. If you do not export, you do not have a beat — you have a DAW project that may or may not open correctly in six months when you try to revisit it. Create the habit of exporting at the end of every session, every time, without exception.
Comparing your first beats to finished professional releases
That polished trap beat you heard on Spotify? It was made by someone with years of experience, hundreds of finished tracks, a treated studio room, potentially thousands of dollars in plugins and samples, and a mixing engineer who spent hours on the final master. Your first beat will not sound like that. It should not sound like that. Your first beat should sound like a first beat — and that is perfectly fine, because it means you have started.
You have now done something that most people only talk about. You opened a DAW, followed a process, and made a complete beat in 30 minutes. That beat is probably not going to win a Grammy. But it exists. It is a real piece of music that you created from silence. That is the hardest part — and you have already done it.
Here is what happens next. You make another beat. Then another. Each one gets faster, better, and more interesting. You start developing opinions about sounds, about tempo, about arrangement. You listen to music differently — not just as a listener, but as a maker, constantly deconstructing what you hear and asking “how did they do that?”
In three months, if you make finishing beats a regular habit, you will look at your first beat and barely recognize it as something you made. The gap between your first attempt and your 30th will be enormous. The gap between your 30th and your 100th will be even larger. That is not talent. That is just repetition and iteration.
The DAW you downloaded has everything you need. There are thousands of free tutorials on YouTube. There are communities of producers at every skill level sharing knowledge. The resources exist. The only variable is whether you show up.
So show up. Make another beat tomorrow. And every day after that.
Learning path
Related answer hubs
Related catalog
More tutorials from the catalog
More tutorials from the Plugg Supply feed, ranked by catalog popularity.
![Udemy POV Essential Guitar Techniques For Beginners [TUTORiAL]](/images/posts/udemy-pov-essential-guitar-techniques-for-beginners-84739.avif?v=20260709)
Udemy POV Essential Guitar Techniques For Beginners [TUTORiAL]
![Udemy Lead Guitar Mastery Solo Like a Pro [TUTORiAL]](/images/posts/udemy-lead-guitar-mastery-solo-like-a-pro-84715.avif?v=20260709)
![Udemy Trap and Hip Hop Music Production with Ableton Live 12 Complete [TUTORiAL]](/images/posts/udemy-trap-and-hip-hop-music-production-with-ableton-live-12-84659.avif?v=20260709)
Udemy Trap and Hip Hop Music Production with Ableton Live 12 Complete [TUTORiAL]
![MixWithTheMasters WondaGurl Writing and Producing DAMAGE [TUTORiAL]](/images/posts/mixwiththemasters-damage-wondagurl-and-sadboi-84656.avif?v=20260709)
MixWithTheMasters WondaGurl Writing and Producing DAMAGE [TUTORiAL]
article.relatedTitle
Udemy POV Essential Guitar Techniques For Beginners [TUTORiAL]
Udemy Trap and Hip Hop Music Production with Ableton Live 12 Complete [TUTORiAL]
MixWithTheMasters WondaGurl Writing and Producing DAMAGE [TUTORiAL]
![PedeBeats Trap Production Course [TUTORiAL]](/images/posts/pedebeats-trap-production-course-84501.avif?v=20260709)
![Mastering.com Mixing and Mastering Cheat Sheet Binder [TUTORiAL]](/images/posts/masteringcom-mixing-and-mastering-cheat-sheet-binder-84407.avif?v=20260709)
Mastering.com Mixing and Mastering Cheat Sheet Binder [TUTORiAL]
Frequently Asked Questions
- Do I need a degree to make beats?
- No. Not a single music degree, production certificate, or formal training is required to make beats. Some of the most successful producers in history — Metro Boomin, Zaytoven, DJ Premier — learned entirely by doing. What matters is your ear, your taste, and the hours you put in. The internet has democratized music production completely. You have access to the same tools professionals use. Start today.
- How long does it take to become good at making beats?
- It depends entirely on how intensively you practice. With focused daily effort, most beginners can make a solid, shareable beat within 2 to 4 weeks. Becoming consistently good — meaning you can execute any idea you hear in your head — typically takes 6 to 12 months of dedicated practice. Mastery is a years-long journey. Do not compare your day one to someone elses year five. Focus on the process, not the timeline.
- Can I make beats on my phone?
- Yes, and it is more capable than you might think. FL Studio Mobile, GarageBand (iOS), BandLab, and Soundtrap all let you compose full beats on a phone or tablet. The workflow is obviously more limited than a desktop DAW — editing MIDI on a tiny screen is painful — but if a computer is not accessible, mobile apps are a legitimate starting point. Think of it as a sketch pad, not a final destination.
- What DAW do most professional producers use?
- There is no single answer. FL Studio dominates hip-hop and electronic production — names like Southside, Murda Beatz, and Martin Garrix use it. Ableton Live is the industry standard for electronic, pop, and live performance. Logic Pro is ubiquitous in studios worldwide, especially for Mac users. Film composers and classical producers lean toward Cubase or Logic. The best DAW is the one you open every day and…
- How do I get better at making beats fast?
- Finish beats. That is the single most important advice. Do not spend three days perfecting a kick drum sound when you have not finished a single track. Make a beat in 30 minutes, export it, move on. Make another one the next day. Quantity accelerates learning. You will internalize what sounds right only through repetition. Additionally, actively listen to music you admire — not passively, but with headphones on,…
- Should I learn music theory before making beats?
- No. Start making beats now and learn theory as you go. Many producers never study formal theory and build successful careers. That said, basic chord knowledge — understanding what a major vs. minor chord sounds like, how a root note relates to a bass line — will accelerate your progress and make your melodies sound more intentional. But do not let the absence of theory knowledge stop you from starting. Open your…